Showing posts with label Super Simple. Show all posts

Wednesday, November 7, 2012

Bayou Brownies


Would you like a super easy knock-your-socks off dessert?  Well, look no further than these blonde Bayou Brownies.  The first time I baked these my 16 year old son loved them so much he had to practice some severe self control to keep from eating 1/2 the pan.

When I originally made these I didn't have time to take pics so I saved some in the freezer.  The brownies were in the freezer for a few weeks and not wrapped very well I might add.  After the photo session, my son ate the rest of the brownies and still commented on how good they were.

These brownies are a nice change from typical chocolate brownies and would be perfect for a potluck or holiday party.

Buon Appetito!


Bayou Brownies
source: www.myrecipes.com
prep: 10 minutes
bake: 40 minutes
yield: 15 servings
calories: 417
fat: 20 grams

1 cup chopped pecans 
1/2 cup butter, melted 
3 large eggs, divided 
1 (18.25-oz.) package yellow cake mix 
1 (8-oz.) package cream cheese, softened 
1 (16-oz.) package powdered sugar


1. Combine pecans, butter, 1 egg, and cake mix, stirring until well blended; press in bottom of a lightly greased 13- x 9-inch pan.
2. Beat remaining 2 eggs, cream cheese, and powdered sugar at medium speed with an electric mixer until smooth. Pour over cake mix layer.
3. Bake at 325° for 40 minutes or until set. Cool in pan on a wire rack. Cut into squares.

Friday, November 2, 2012

Turnip Green Stew


When we lived in Meridian, MS we had some of the best neighbors.  Buster and Jewel was an elderly couple that lived across the street and became like grandparents to our family.  I remember the first time we met Mrs. Jewel, she was so excited to tell us about her church and how much they loved the pastor. She was so convincing that we visited the church.  We loved the church too and ended up joining and serving for three years until Brandon received orders to Charleston, SC. 

Mrs. Jewel loved sharing recipes, shopping deals or anything else that she thought would be of interest to me. This was one of those recipes. She told me it was the best turnip green recipe she had ever eaten. She was right about the church so I was certain that these greens would be great.  It is now one of my favorite recipes.  Mrs. Jewel is so wise.  

The recipe makes a lot, so for our family of four I typically prepare only 1/2 the amount. These greens go great with a side of buttered cornbread!

Buon Appetito!

Turnip Greens Stew
prep: 5 minutes
cook: 30 minutes
yield: 6 to 8 servings
calories: 114
fat: 5.1


  • 2 cups
     chopped cooked ham 
  • 1 tablespoon vegetable oil 
  • 3 cups chicken broth 
  • 2 (16-ounce) packages frozen chopped turnip greens
  • 1 (10-ounce) package frozen diced onion, red and green bell peppers, and celery
  • 1 teaspoon sugar 
  • 1 teaspoon seasoned pepper
  1. Sauté ham in hot oil in a Dutch oven over medium-high heat 5 minutes or until lightly browned. Add broth and remaining ingredients; bring to a boil. Cover, reduce heat to low, and simmer, stirring occasionally, 25 minutes.
  2. Collard 'n' Black-eyed Pea Stew: Substitute 1 (16-ounce) package frozen chopped collard greens for turnip greens. Prepare as directed, and cook for 15 minutes. Add 1 (16-ounce) can black-eyed peas, drained, and cook 10 more minutes.

Friday, October 5, 2012

Freezer Friendly Bacon-Wrapped Chicken


This is one of my favorite go-to freezer friendly dishes.  These moist Bacon-Wrapped Chicken breasts are stuffed with onion and chive cream cheese then wrapped in bacon.  My family always gobbles them up.

This recipe reminds me of the first time we invited an Italian family (Davide and Ester and their two kids) over for lunch after church.  My older son, Graham, had gotten to know Davide through his involvement in the youth group.  They seemed like such a sweet family, and we really wanted to get to know them better.

Davide and Ester speak very good English, but sometimes communication could still be a little challenging, but I guess that can be true even when both parties speak English as their first language.  At the time, we all attended chapel services on base.  The chapel offered two Sunday morning services.  We typically attended the earlier service, and Davide and Ester attended the later service.  When I invited them for lunch I explained that we would attend the early service, but let them know if they wanted to attend the late service they could meet us at the house.  Davide said they would attend both services and meet us after church; at least that is what I thought he said.  Attending two Sunday morning services didn't make a lot of sense to me, but who am I to judge, and besides it would give me enough time to have lunch ready.  Much to my surprise they met up with us after the early service and were ready to go.

Typically when entertaining I like to get everything ready before the guests arrive so that I can relax and enjoy my guests.  I definitely don't like to put my guests to work especially the first time I have them over.  However, I had lots to do before we could eat so I reluctantly asked Ester to help prepare the Bacon-Wrapped Chicken.  We had a great time in the kitchen together, and she loved learning to cook American style.  I think we had more fun cooking than we would have had just sitting and talking.

We became very good friends during our time in Italy.  At our going away party Ester was wearing a lovely turquoise necklace, which is one of my favorite colors.  I told her that I thought it was really cute.  As she was getting ready to leave she insisted that I have her necklace.  I was so touched by her thoughtfulness, but told her that I could not take her necklace.  Ester is sweet but stubborn, and she wouldn't hear of it.  After some persuasion, I accepted the gift. I love it.  Every time I look at it or wear it I think of sweet Ester.  She will always be in my heart regardless of how many miles or years separate us.

Freezer Friendly Bacon-Wrapped Chicken
yields: 12 servings


12 boneless skinless chicken breasts halves
2 cartons (8 ounces each) whipped cream cheese with onion and chives
2 Tbsp butter (I typically leave out the butter.)
Salt to taste
12 bacon strips 

  1. Flatten chicken breasts to 1/2 inch thickness. 
  2. Spread 3 Tbsp cream cheese over each. 


  1. Dot with butter and sprinkle with salt; roll up. 
  2. Wrap each with a bacon stip. 
  3. Place seam side down, in a greased pan. 

  1. Bake, uncovered, at 400 degrees for 35-40 minutes or until juices run clear. 
  2. Broil 6 inches from the heat for 5 minutes or until bacon is crisp. 


Freeze these uncooked. 


Thursday, October 4, 2012

Semi-Homemade Individual Pita Pizzas


Who doesn't love pizza? Who doesn't love homemade pizza? I love both. As much as I love homemade pizza, often times I just don't want to mess with making the dough from scratch or simply don't have enough time. 

These semi-homemade pizzas are great for a quick and healthy meal or snack. They are easy to assemble and the best part is you can create your own delicious pizza just the way you like it. By using store bought sauce (pizza sauce, spaghetti sauce, or white sauce) and crust (pita bread, flatbread, or individual pizza crust), these pizzas are a snap to make. They are great for kids too since they can add their favorite toppings.  

I was in pizza heaven while living in Italy, the birthplace of pizza. The Italians use simple, fresh ingredients. The crust is thin creating a perfect balance of crust and toppings. I know everyone has their own preference when it comes to pizza and some may like a thicker crust, but not me. Give me a thin crust pizza loaded with veggies, and I am one happy girl. 

Tip ~ If you are trying to eat healthy be careful when choosing the crust. Some crusts and flatbreads are not low fat or low calorie. Pita bread seems to be the healthiest option and is my choice when making these pizzas. 

Buon Appetito Pizza!


Semi-Homemade Individual Pita Pizzas
yield: 8 servings
prep: about 15 minutes
bake time: 10-12 minutes 


Store bought pizza or spaghetti sauce ~ any brand will work 
4 flat bread rounds (without pockets), pita bread, or store bought individual pizza crusts
2 plum tomatoes, sliced
1 cup (4 ounces) shredded part-skim mozzarella cheese
2 Tbsp snipped fresh basil
Any other toppings you desire (pepperoni, ground sausage, veggies, cheese etc.)

  1. Preheat oven to 450 degrees. 
  2. Place pita rounds on a baking stone or baking sheet. 
  3. Spoon spaghetti sauce on crust leaving about a 1/2 inch border. 
  4. Top pita rounds evenly with tomatoes and cheese and other toppings. 
  5. Bake 10-12 minutes or until cheese is melted and edges are lightly browned. 
  6. Sprinkle with basil. 
  7. Cut pizzas into quarters. 
  8. Serve warm 

Friday, September 28, 2012

3 Ingredient No-Bake Peanut Butter Bars


Do you have 10 minutes in the evening to dedicate to making a delicious healthy breakfast? If so, you have to try these bars!

Breakfast is so challenging at my house. My boys do not typically like the same foods for breakfast. My older son enjoys a traditional breakfast of eggs and bacon or sausage, pancakes or waffles. My younger son would rather eat pizza, spaghetti or leftovers from the night before. I have to admit, spaghetti was often on my breakfast plate as a kid, but when I became pregnant with my first child that all changed and from then on I could only eat breakfast foods for breakfast. Spaghetti for breakfast ~ yuck!  Since he will not experience pregnancy, I am hoping puberty hormones will eventually cause him to develop a more mature palate.

These Peanut Butter Bars are AMAZING! I made some last night and served them this morning with fingers crossed. Both boys really liked them! That totally excites me, but what excites me even more is that the bars are healthy too. They were eating oatmeal and they didn't even care! Woohoo! I can't get them to eat oatmeal for anything. So this recipe is definitely a keeper.

I feel a little David Letterman coming on.

Top 10 reasons why you should make this recipe:

10. Only 3 ingredients!
9. 10 min prep time!
8. Both my boys like it so I bet your family will too!
7. Perfect on-the-go food!
6. Customizable ~ add in dried fruit, nuts, or protein powder (for extra flavor and protein)
5. Satisfies longer than sugary cereals, bars, or processed pastries!
4. Oats help lower cholesterol!
3. No baking required!
2. No morning dishes to wash!


and the number one reason you should make these bars 

  1. Your kids will be eating oatmeal and loving it!
Buon Appetito!

3 Ingredient No-Bake Peanut Butter Bars
source: www.food.com 
prep: 10 min
bake: 0 min
yield: 12 bars
calories: 281
fat: 12.2


1 cup natural peanut butter
1 cup honey*
3 cups old fashioned oatmeal*

  1. Put peanut butter and honey in a heavy saucepan and heat on low until thoroughly combined and becomes a liquid consistency. 
  2. Mix in oats and stir. 
  3. Press into a 9 x 9 inch pan. 
  4. Cover and let set overnight. 


*for gluten free, use gluten free oats
*for clean eating, use raw honey

Tuesday, September 18, 2012

Smothered Hamburger Steaks and Onions

Hamburger steak is a typical southern recipe. Dressed up hamburger patties with gravy makes for some delicious comfort food, and since ground beef is inexpensive you don't have to worry about busting your grocery budget. I know you all have a grocery budget, right? This dish is low carb making it a perfect choice if you are trying to limit carb consumption.

I first came across this recipe several years ago when I was doing a lot of freezer cooking.  It has become one of our favorite family recipes. For those that don't care for onions, the onions are sliced and can be easily picked out.

Buon Appetito!


Smothered Hamburger Steaks and Onions
yield: 6 servings
calories: 336
fat gram: 10


2 pounds lean ground beef
2 tsp salt
1/4 tsp pepper
1/2 cup cold water
1/4 cup fine dry bread crumbs
1 large onion, sliced
Beef gravy (bottled, canned, or mix) I like to use 2 packages of McCormick brown gravy mix following directions on package. 

Mix all ingredients except onions and gravy. Shape into patties (I like to make 4 oz. patties) and brown in greased skillet. Turn; add onions. Add gravy; cover and simmer 30 minutes. Serve with rice or mashed potatoes. 

To freeze, prepare patties. Place a sheet of wax paper between patties. Place in a freezer bag and store in freezer for up to 6 months. You can also freeze leftovers in a freezer bag. If freezing raw meat, when ready to cook simply thaw and cook per recipe instructions. If freezing leftovers, simply thaw and reheat in microwave or on stove.

Thursday, September 13, 2012

Roasted Tomato-and-Feta Shrimp


This recipe is so versatile and can be served as an appetizer, salad, or main dish. The beauty of the fresh ingredients make for a gorgeous presentation. All these are good reasons to make this recipe, but the best reason is because it is delicious!

I think it is awesome and I think you will love it too :)


Buon Appetito!

Roasted Tomato - and - Feta Shrimp
source: Southern Living December 2010
6 servings
prep: 10 minutes
bake: 25-30 minutes
calories per serving: 233
fat grams per serving: 12.3
nutritional info does not include French bread

  • 2 pt. grape tomatoes
  • 3 garlic cloves, sliced
  • 3 tablespoons olive oil
  • 1 teaspoon kosher salt
  • 1/2 teaspoon pepper
  • 1 1/2 pounds peeled and deveined, medium-size raw shrimp (31/40 count)
  • 1/2 cup chopped jarred roasted red bell peppers
  • 1/2 cup chopped fresh parsley
  • 1 (4-oz.) package crumbled feta cheese
  • 2 tablespoons fresh lemon juice
  • Crusty French bread, sliced
  1. Preheat oven to 450°. Place tomatoes and next 4 ingredients in a 13- x 9-inch baking dish, tossing gently to coat. Bake 15 minutes. Stir in shrimp and peppers. Bake 10 to 15 minutes or just until shrimp turn pink. Toss with parsley, feta cheese, and lemon juice. Serve immediately with crusty French bread.

Monday, September 10, 2012

Nana's 7 Layer Salad

This is Nana.


This is Nana's 7 Layer Salad.


This is how I feel when I eat Nana's 7 Layer Salad.


Any questions?

 This salad is one of my mom's, aka Nana, favorite recipes. We enjoyed it often when I was growing up.  I remember mom entering this recipe in a 4-H cooking contest and winning first prize. It is perfect served in a trifle bowl since it allows you to see all the beautiful layers. If you want a lighter version you could simply use light dressing and/or light cheddar cheese.  The measurements are not exact which allows you to easily modify the amount needed for your family. 

Buon Appetito!

Nana's 7 Layer Salad

Layer ingredients in the following order:
Iceberg lettuce or lettuce of your choice, torn into bite size pieces 
Chopped tomatoes

Sliced purple onions
1 can Ranch Style Beans, drained
Cheddar Cheese, grated
Creamy Italian Salad Dressing (Seven Seas Green Goddess is what Nana uses.) 

Sprinkle enough Fritos to cover the top just before serving.

Friday, September 7, 2012

Roasted Green Beans with Sun-dried Tomatoes


I'm back!! It feels so good to sit here and type this blog post. Life is slowing down a bit and I am loving it!!! I hope you all enjoyed a great summer. Fall will be here before we know it and soon I will be posting yummy fall comfort foods. The leaves here in Maryland are already starting to fall, which seems odd since it is in the 90s today. In Sicily we didn't experience fall like in the states so I am looking forward to the trees changing colors soon. We have gorgeous views from our house and can't wait for the sea of green trees to change to autumn shades.

Veggies are so important to a healthy diet and should be served with each meal. I don't know about you, but it is always a challenge to come up with new ways to cook vegetables. One of my favorite ways to prepare vegetables is to roast them. Roasting is super easy and a really healthy way to enjoy your favorite veggies.

I love this recipe; the combination of green beans and sun-dried tomatoes is perfect. While living in Italy sun-dried tomatoes became one of my favorite foods. I love them in salads, on sandwiches, and in pasta.

This recipe calls for fresh green beans. You could use frozen, too. It also calls for pine nuts. I had a ton of pecans so that is what I used. It still turned out scrumptious.

Buon Appetito!

Roasted Green Beans with Sun-dried Tomatoes
source: Southern Living November 2010
serves: 8-10
prep time: 15 minutes
cook time: 25 to 30 minutes
for 8 servings:
calories 178 
fat 15.1

1 1/2 fresh green beans trimmed
1/2 cup sun-dried tomatoes in oil, chopped
1/3 cup pine nuts
3 Tbsp butter, melted
3 Tbsp olive oil
1 tsp
1/2 tsp pepper

Preheat oven to 425 degrees. Toss together all ingredients. Place mixture on a 18 x 12 inch jelly-roll pan. Bake 12 to 15 minutes or to desired degree of doneness, stirring twice. 


Monday, June 4, 2012

Quick Yeast Spoon Rolls

My family has enjoyed this super duper easy bread recipe for many years. These rolls taste just like yeast rolls, without all the work of kneading and waiting for dough to rise. I love the fact that the dough can be kept in fridge for several days allowing you to make only as many as needed. Be prepared for lots of ooohs and aaahs when you serve these yummilicious rolls.


Quick Spoon Rolls
Yield: 24 rolls

1 package dry yeast
2 T. warm water
2 cups warm water
3/4 cup vegetable oil
4 cups self-rising flour
1/4 cup sugar
1 egg beaten

Assemble all ingredients and utensils. In a small bowl dissolve yeast in 2 T. warm water. In a large mixing bowl alternatively combine remaining liquid and dry ingredients. Add beaten egg and dissolved yeast and water mixture. Mix well. Spoon rolls into greased muffin tins. Bake at 400 degrees for 15 to 20 minutes. Batter keeps in fridge for several days.

Buon Appetito!

Thursday, May 24, 2012

Light Strawberry Flower Cake


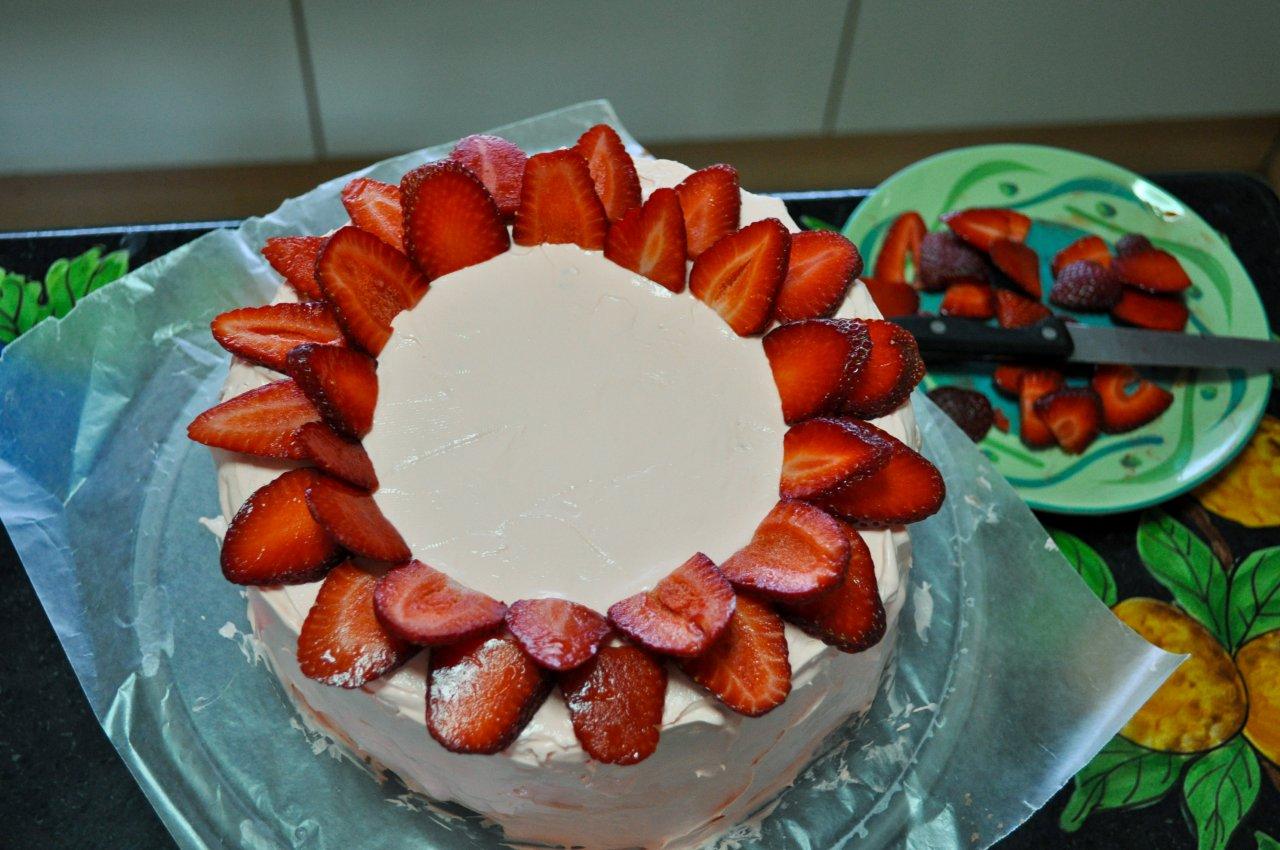
In the words of Hannibal Smith, "I just love it when a plan comes together!"  About a week ago my friend Ginny and I were working out and discussing that our friend Leah's 30th birthday is today.  We knew that she wasn't thrilled about turning the big 3-0 so we decided to throw her a small surprise party.  We only had 5 days to plan the party since she will be out of town the weekend of her birthday and we wanted to do it before she left.  We brainstormed some ideas and came up with a plan.  We divided up the tasks and one of my jobs was to bake the cake.  Since strawberries are in season it was an easy decision to do a strawberry cake.

The hard part was deciding which strawberry cake recipe to choose.  I wanted to find an easy, light recipe.  I searched through some of my favorite sites and found Sweetheart Strawberry Cupcakes recipe at www.dashingdish.com.   Dashing Dish is one of my favorite food blogs.  The author truly has a heart for the Lord and she is so stinkin' adorable too!  All the recipes are her own creation and healthy.  So far, all the recipes I have tried have been great!


Her strawberry cupcake recipe couldn't be simpler.  It is just a strawberry box cake mix and red soda (diet or regular).  That's it! I had my doubts, but it was surprisingly good and really moist.


Instead of cupcakes, I planned to make a 2 layer cake, but I didn't let one of the layers cool completely after baking and when I tried to remove it from the cake pan it broke apart.  So I had to bake another cake mix and ended up using all 3 layers for the cake.  It was a yummy mistake since we got to eat the messed up layer, and it worked out for the best since three layers is really the perfect height for this cake.


After deciding on the cake recipe, I had to decide how to decorate it.  I am not a cake decorator.  So I needed a really simple design.  I searched through www.pinterest.com for ideas and came across a cake with a flower made from strawberries from Lick the Bowl Good  food blog.  She showed a step by step tutorial on how to make the flower.  It looked so easy I knew even I could do it.  Here's how.

Place sliced strawberries in a circle along the outer edge of the top of the cake.

Add another layer of sliced strawberries inside the outer layer of strawberries.

Repeat layering until cake is covered. Place a whole strawberry in the center to finish.
I added the white sprinkles by throwing them at the cake allowing them to stick where they landed. There were lots of little white balls all over my kitchen floor :) I also added strawberry halves along the base of the cake.


<><>
I was so pleased with the final result!


The party turned out great and everything came together in just a few days.  I feel extremely blessed to have such good friends to share life's milestones.  Happy 30th Birthday Leah!!


Light Strawberry Cake 
adapted from: www.dashingdish.com
yield: 12 servings

Ingredients:


Cake:
2 strawberry box cake mixes
2 (12 oz.) cans or 3 cups diet or regular red soda


Icing:
12 oz. light Cool Whip
2 (1.4 oz.) sugar free vanilla pudding mixes
1 1/2 cup skim milk
Red or pink food coloring
  • Preheat oven to 350 degrees. Grease and flour cake pans. Beat cake mix and soda together until smooth and creamy.
  • Divide the batter into four 8 or 9 inch cake pans. If you don't have four cake pans, divide the batter in half setting aside one half of the batter. Pour divided cake batter into two 8 or 9 inch round cake pans.
  • Bake according to instructions on box.
  • While cake is baking, mix together pudding mix, milk, Cool Whip, and food coloring. Slowly beat or whisk whipped topping until all of the ingredients are just combined. (Be careful not to over mix). Add as much food coloring you need in order to get the color you desire. Chill in fridge until ready to use.
  • Allow the cakes to completely cool before removing from pan or you may end up with a yummy mistake like I did! Once cooled, dump onto cooling rack.
  • Regrease and flour pans and bake the rest of the batter dividing it into the 2 pans. Since this is a three layer cake you will have one layer left over. One option is to make cupcakes instead of the fourth layer or make a four layer cake. You may need to prepare more icing than the recipe calls for.
  • Bake layers/cupcakes according to box instructions. Allow to cool. Once the layers are completely cooled begin assembling the cake.
  • Spread a layer of icing on top of the bottom layer. Place the second layer on top of the bottom layer. Spread a layer of icing on the second layer and place the third layer on top. Cover the cake with icing. The nice thing about whipped icing is that unlike buttercream it doesn't need to be smooth to look good. The messier, the better. Decorate with strawberries and sprinkles.
Tips:
  • I baked the layers the day before and wrapped them individually in plastic wrap until I was ready to assemble the cake. This made the cake even moister than it would have been if I had served it the same day it was baked.
  •  I placed a piece of wax paper under the cake and used the paper to turn the cake while icing it.  This made it much easier to decorate and maneuver the cake.  After decorating the cake I tore the wax paper so that it couldn't be seen.
Per Serving:
Calories: approx. 325 using regular soda 300 using diet soda
Fat: 5 grams


Buon Appetito!


Monday, April 30, 2012

Baked Goat Cheese Dip


Fat Girl Trapped in a Skinny Body is one of my favorite blogs.  I love the author's humor and often lol when reading her post.  Her food looks great and is very different from my style of cooking.  I think one reason I like her blog so much is because I get ideas for foods that I wouldn't normally cook. For example, I have noticed that she often shares recipes that include goat cheese.  She even has a recipe for Goat Cheese Stuffed Cookies.  I had never tried goat cheese before and was really curious. I saw this recipe for Baked Goat Cheese Dip in Southern Living Magazine I thought I would give it a try.

Goat cheese has a very distinct flavor and reminds me a lot of feta cheese, which I love.  If you like feta, I think you will really enjoy this easy appetizer recipe.


Baked Goat Cheese Dip

Southern Living

DECEMBER 2010

Yield: 12 servings

Ingredients 

1 small onion, diced
1 tablespoon olive oil
2 garlic cloves, minced
2 tablespoons tomato paste
1/4 teaspoon dried crushed red pepper
Pinch of sugar
1 (14.5-oz.) can petite-diced tomatoes
1/4 cup chopped sun-dried tomatoes in oil
1/4 cup torn basil leaves
Salt and pepper to taste
2 (4-oz.) goat cheese logs, softened
1 (8-oz.) package cream cheese, softened
Assorted cut vegetables and bread cubes

Preparation

    1. Preheat oven to 350°. Sauté onion in hot oil in a 3-qt. saucepan over medium-high heat 5 minutes or until tender. Stir in garlic and next 3 ingredients, and cook, stirring constantly, 1 minute. Stir in diced and sun-dried tomatoes. Reduce heat to medium-low, and simmer, stirring occasionally, 10 minutes or until very thick. Remove from heat, and stir in basil and salt and pepper to taste.
    2. Stir together goat cheese and cream cheese until well blended. Spread into a lightly greased 9-inch shallow ovenproof dish. Top with tomato mixture.
    3. Bake at 350° for 15 to 18 minutes or until thoroughly heated. Serve with assorted vegetables and bread cubes.
    Make ahead: Prepare recipe as directed through Step 2. Cover and freeze up to 1 month. Thaw in refrigerator overnight. Let stand at room temperature 30 minutes. Bake as directed.

Monday, April 2, 2012

Coconutty Orange Salad


Last week I baked some delicious $100,000 Cinnamon Rolls. The recipe calls for orange zest which left me with four zested oranges. I hate to waste food and try to either eat as leftovers, freeze, or use in another dish. I started thinking about what I could do with those oranges. In Sicily, they have an amazing orange salad that consists of blood oranges, green onion, and olive oil. I know it might not sound too appealing, but I can assure you it is wonderful. These simple ingredients go perfectly together. I didn't have any green onions but the thought of the Sicilian blood orange salad gave me inspiration to create a different type of orange salad.

Having just made the cinnamon rolls, I had some leftover pecans. I found some shredded coconut and golden raisins in the pantry and added them to the oranges. I drizzled some honey on top and sprinkled with cinnamon then stirred well. I was very pleased with the results and really enjoyed the light, tropical flavor the coconut added. My hubby really enjoyed it too, which is always a good sign. Topped with whipped cream or light cool whip this Coconutty Orange Salad would make a nice figure friendly dessert.


Coconutty Orange Salad
yield: 4 servings

4 medium oranges
1/4 cup golden raisins (or regular)
1/4 cup shredded coconut
2 shakes of cinnamon
1/2 tablespoon of honey

Mix ingredients together. It can be eaten immediately or allowed to chill then eaten.


Buon Appetito!


Saturday, March 24, 2012

Easy Sweet and Sour Chicken (updated with photo)


I am reposting this recipe because the original post didn't include a photo. This is one of my favorite easiest dishes to prepare. The dish only calls for 4 ingredients. A friend of mine suggested adding pineapple chunks to the sauce. I think that sounds delightful!


Sweet and Sour Chicken
serves 4-6

2 to 3 lb. chicken breasts
12 oz. jar apricot preserves
1 pkg. dry onion soup mix
8 oz. Russian salad dressing

Place chicken in a shallow baking pan. Mix soup mix, dressing, and preserves and pour over chicken. Bake at 350 degrees for 1 1/2 hours. Serve with white rice.